How I built this website
This is a very quick walkthrough of how I built this website in an afternoon using the Minimal Mistakes template for Jekyll. Read this article to learn more!
I have summarized the steps to the bare minimum you need to get started with your own website. For more detailed/additional information you can always consult the resources section below.
For this project I used a machine running MacOs Catalina. These steps may or may not work depending on your Operating System and version.
Minimal steps I took:
I. Install Prerequisites
I installed the Jekyll prerequisites for MacOs (reproduced below). You can also look at the official prerequisites documentation here.
## Install xcode if you haven't
xcode-select --install

# You will need homebrew
/bin/bash -c "$(curl -fsSL https://raw.githubusercontent.com/Homebrew/install/HEAD/install.sh)"

# Use homebrew to install Ruby (you may need to restart your terminal)
brew install ruby

# Add the following line to your .zshrc or your .bash_profile
PATH="/usr/local/opt/ruby/bin:$PATH"

# Relaunch your terminal or source it:
source ~/.zshrc # For Zsh
source ~/.bash_profile # for Bash
II. Install Jekyll and bundler gems
gem install --user-install bundler jekyll

## Get your Ruby version:
ruby --version  # You will get something like 2.7.3

# Add the following line to your .zshrc or your .bash_profile
# BUT replace the X.X with the first two digits of your ruby version
PATH="$HOME/.gem/ruby/X.X.0/bin:$PATH" # Example for version 2.7.3: PATH="$HOME/.gem/ruby/2.7.0/bin:$PATH"
III. Create a GitHub repo with the Minimal Mistakes theme starter
- I clicked on the Minimal Mistakes theme starter on GitHub as my starting point. I named my repository with my user name
damian-romeroand the suffix.github.io. This will:- Generate a personal website hosted on GitHub (GitHub pages) with the contents of your repository as
username.github.io. - Allow you to work and test locally on your computer before you push any changes to your website.
- The
theme starter repothat you click on already contains the correctly generated Gemfile that you need to use for GitHub pages, so I did not need to follow the instructions for using the Minimal Mistakes as a remote theme.
- Generate a personal website hosted on GitHub (GitHub pages) with the contents of your repository as
* Note: If you do not have a GitHub account, go to the resources section and follow the link. You will need to learn how to use Git as well.
IV. Test your site locally
You can test your site on your computer before you push it to your remote.
bundle exec jekyll serve

# Go to http://127.0.0.1:4000 on your browser and look at your website
# Press ctrl + c to quit at any time
Note that, if you get an error saying ERROR '/favicon.ico' not found, it may mean you need to run the above command from the root directory of your git repository.
V. Start adding content
- In the sub-directory
_pagesyou can add any markdown on html pages you want. Then you can display them by adding them to the_data/navigation.ymlfile. For instance, at the top of my page you can seeHome,About, etc. These are markdown or html files that are listed in_data/navigation.ymlas below:
main:
  - title: "Home"
    url: https://d-romero.com/
  - title: "About"
    url: /about/
  - title: "Portfolio"
    url: /portfolio/
  - title: "MCEC"
    url: /mcec_project/
  - title: "News"
    url: /news/
- Play around with your _config.yml file.
- The _config.yml file is not loaded dynamically as the other contents of your website so you will need to run
bundle exec jekyll serveevery time you make a change - Look for inspiration from the full _config.yml file in the Minimal Mistakes GitHub repo: https://github.com/mmistakes/minimal-mistakes/blob/master/_config.yml
- The _config.yml file is not loaded dynamically as the other contents of your website so you will need to run
- Add
postsas markdown files to your_posts. Posts have a specific structure. For an example look at my first posts here - Further develop your site. You can follow the Minimal Mistakes customization documentation here.
VI. Push to remote
Once you are happy with your progress, follow the normal Git/GitHub steps to push to remote. Make sure you are not pushing any confidential information
git add -A
git commit -m 'First commit'
git push
VII. Visit your site
open https://username.github.io # replace 'username' with your user name
VIII. Custom domain
Because I wanted to have my custom domain instead of using https://damian-romero.github.io, I did the following (I linked a YouTube video tutorial on how to set up your custom domain in the references section, although it was a bit outdated):
- I got a Google domain for $12 USD per year.
- I created a text file inside my repository called
CNAME(no file extension). The only content in this file is the domain for my website (d-romero.com)cd my/repo/directory touch CNAME echo d-romero.com >> CNAME - Once I had my domain, I had to point my site to GitHub:
- I went to
My domainson the side bar. - I clicked on the domain I wanted to use (I’ve got several, but for this case I wanted to use d-romero.com)
- I clicked on the the
DNSlink on the side bar. - I scrolled down to
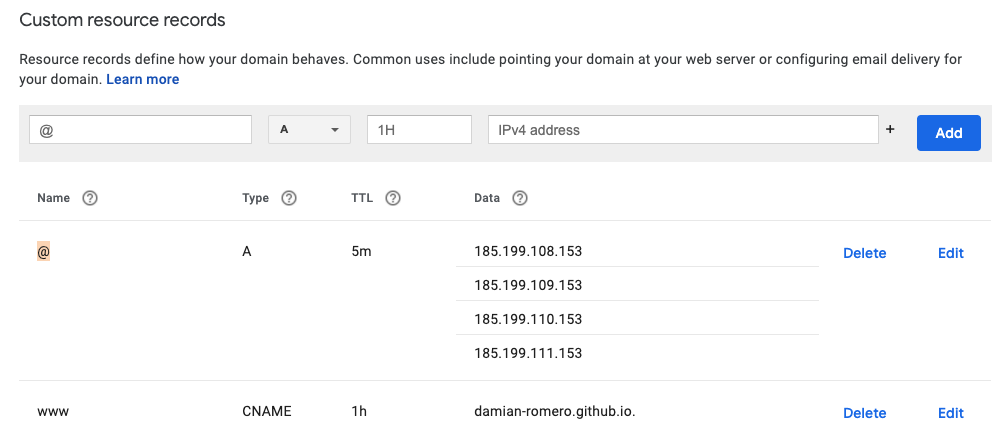
Custom resource records. - I followed the official GitHub documentation and created an “A” record with the following IP addresses:
- 185.199.108.153
- 185.199.109.153
- 185.199.110.153
- 185.199.111.153
- I created an additional record as such:
- www CNAME 1h damian-romero.github.io
- I went to
The result looks like this:

IX That is it!
You’ve made it. Now you’re the proud owner of your personal website.
Resources
- GitHub
- Git
- Jekyll
- Minimal Mistakes
- Custom domain YouTube tutorial
- Custom GitHub domain configuration documentation
- Configuring a custom domain for your GitHub Pages site
- Learn markdown
You can check out my website repository here
Jump higher!
- Damian

